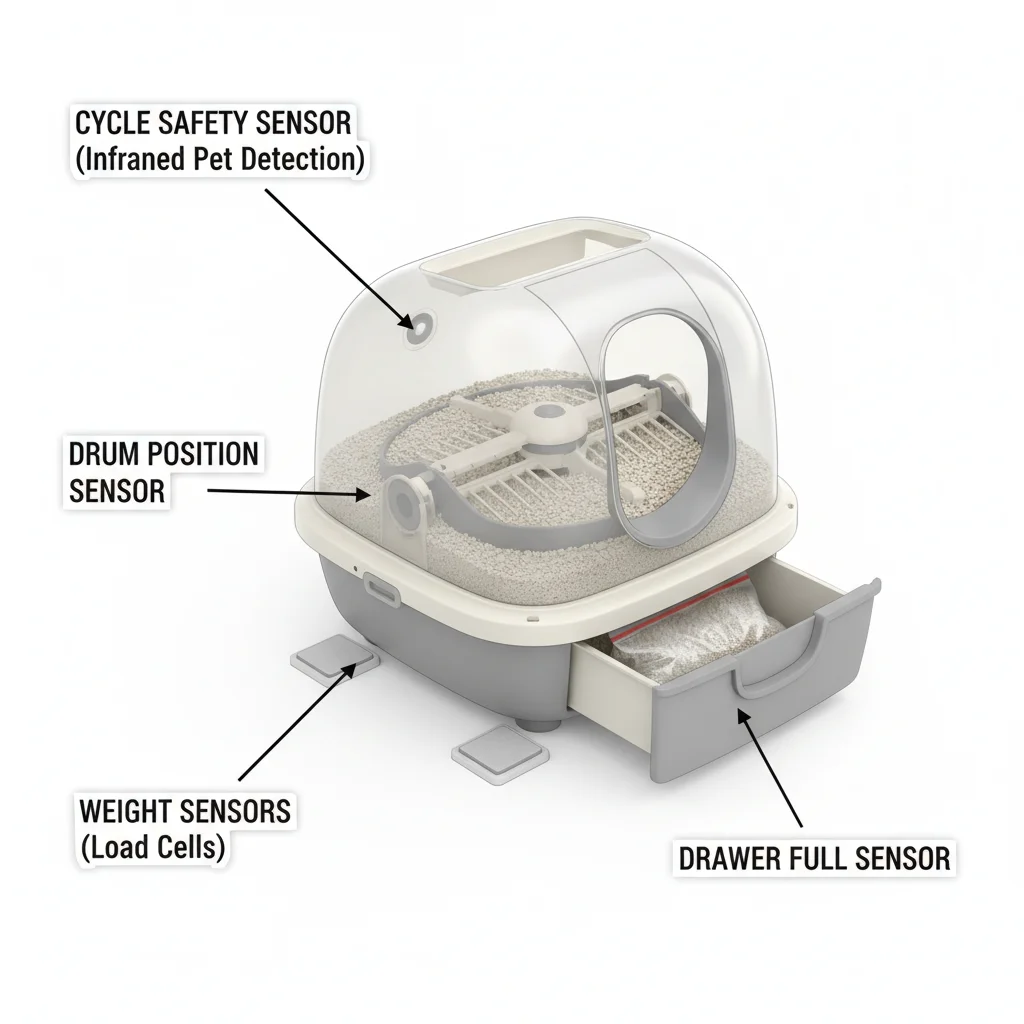
Sensor types and what each one controls
Most owners assume a silent unit means a dead motor. In practice, automatic litter box sensor failure is the more common story: the machine refuses to cycle because weight, drawer, or safety sensors will not clear a “safe to move” state.
Most “broken” auto litter boxes are sensor or calibration issues—not dead motors. That distinction saves money and prevents dangerous DIY hacks. False drawer-full alerts often trace to litter type, not defective hardware—especially after a litter brand change or a dusty multi-cat week.
This guide maps sensor jobs, brand-specific failure patterns, safe DIY fixes, and the point where chronic faults mean replace. For long-term reliability context on a flagship unit, see the Litter-Robot 5 long-term reliability review. For feature trade-offs across brands, use our Litter-Robot vs Petkit vs Neakasa comparison.
- Weight / presence: detects a cat in or near the globe
- Drawer / waste: estimates fullness and drawer seating
- Safety interlocks: pinch, bonnet, and “do not cycle now” guards
Weight and presence detection
Weight sensors protect cats by delaying or aborting cycles. Drift shows up as phantom “cat inside” faults or missed detections when a light cat enters. Uneven litter depth is the #1 owner-caused trigger.
Recalibrating after adding litter, vacuuming spilled crystals, and keeping the base level fixes more cat-sensor errors than board replacements. Log whether faults cluster after refills—that pattern points to calibration, not a dead load cell.
- Level the base on a firm floor
- Set litter to the manufacturer fill line
- Run the official weight/presence reset in the app or panel
Drawer full and clog alerts
Drawer sensors use optics, weight, or both. Dust films on lenses and clumps bridging the tray create perpetual “full” alarms. Crystal litter that scatters outside the drawer confuses some optical paths more than clay.
Before you order parts, empty, wipe sensors, reseat the drawer, and test with a known-empty tray. If the empty drawer still alarms, you have a stronger case for hardware automatic litter box sensor failure.
- Wipe optical windows with a dry microfiber—avoid soaking electronics
- Check for litter jammed under the drawer rails
- Confirm the liner or bag is not blocking the sensor sightline
Cycle timing and safety interlocks
Pinch detects, bonnet switches, and timed wait windows stop motion when something feels wrong. They are not optional. A unit that cycles with interlocks defeated can injure a cat or a hand.
Intermittent pinch errors often mean litter buildup in the pinch zone or a sticky bezel—not a conspiracy in the firmware. Clean first. Replace sensors only after cleaning fails and support confirms the fault code.
Failure patterns by model family
Symptoms rhyme across brands, but root causes differ. Matching your error pattern to the model family shortens troubleshooting.
Litter-Robot weight sensor drift
Litter-Robot cat sensor faults commonly follow litter depth changes, a cat lingering on the bezel, or gradual calibration drift after 6–12 months. Power-cycle, reset litter level, and inspect pinch areas before assuming board failure.
Persistent hard faults after cleaning may need a sensor or control assembly. That is where ownership cost meets repairability—pair this troubleshooting with the 18-month ownership cost analysis if you are deciding whether to keep investing.
- Phantom cat-inside after recent refill → recalibrate
- Fault only when drawer is heavy → check waste path and seating
- Fault after every cycle → document codes for support
Petkit optical and drawer sensors
Petkit Pura X-class units lean on optical drawer and status sensing that hates dust films. Owners who skip weekly wipes see “full” and “not ready” loops even with an empty tray. App recalibration helps; physical cleaning helps more.
If firmware updates coincide with new false triggers, note the version and test after a clean install of settings. Still treat bypass advice on forums as unsafe—optical faults are annoying, not a reason to defeat safety.
Neakasa and budget clone quirks
Neakasa M1 and budget clones vary widely in sensor documentation. Some recover cleanly after reseating drawers; others spam false alerts until you change litter type or depth. Sparse parts catalogs mean chronic automatic litter box sensor failure can force a full unit swap sooner.
Pre-purchase, ask whether sensor modules are sold separately in your region. A brand that cannot answer that question ages poorly for multi-cat homes that run constant cycles.
DIY fixes that work vs warranty killers
Safe DIY is cleaning, reseating, recalibrating, and firmware resets. Unsafe DIY is cutting wires, taping switches, or forcing cycles with pets nearby.
Cleaning and recalibration steps
Work through this sequence before you open a repair ticket:
- Empty waste and wipe optical windows and weight contact zones.
- Reseat the drawer until latches click; check for warped liners.
- Reset litter depth to the fill line; remove overfill mounds.
- Run the brand’s sensor or weight calibration routine.
- Test three empty cycles, then one after a known deposit.
If empty tests pass and dirty tests fail, look at litter clumps and tracking—not a dead motor. Compatible litter choices from our best litter for automatic litter boxes tests reduce false drawer-full loops for many households.
Firmware and app resets
App glitches freeze stale “full” states. Log out/in, force-close the app, power-cycle the base for 60 seconds, and re-pair if the brand recommends it. Update firmware only on a stable Wi-Fi connection and after cleaning—flashing over a dirty sensor just preserves bad habits in new code.
When to stop and call support
Stop DIY when:
- Hard faults persist on a verified-empty, freshly cleaned unit
- The unit cycles without detecting a cat that is clearly inside
- You smell burnt electronics or see scorched connectors
- Warranty is active and opening the shell would void it
Photograph error screens, serial labels, and litter depth. Support tickets with evidence resolve faster than “it beeps sometimes.”
Preventing repeat sensor failures
Prevention is cheaper than any sensor board. Litter chemistry, depth discipline, and multi-cat traffic explain most repeat automatic litter box sensor failure tickets.
Litter depth and type effects
Overfilling fools weight baselines. Ultra-dusty clay coats optics. Lightweight crystals that bounce out of the tray confuse drawer sensors. Stick to approved litter families and the fill line—even if “a little more” feels like better odor control.
False drawer-full alerts often trace to litter type, not defective hardware.
Multi-cat traffic patterns
Back-to-back visits leave sensors racing between presence checks and waste estimates. In three-cat homes, empty the drawer more often than the app’s optimistic schedule. Capacity guidance in our multi-cat roundups pairs well with sensor hygiene—machines under constant load need cleaner optics, not just bigger globes.
Maintenance intervals that matter
Weekly: wipe sensors and rails. Monthly: deeper clean of pinch zones and drawer tracks. After every litter brand change: recalibrate. After any hard fault: clean before reset spam. Apartment owners chasing odor should not skip these steps while shopping quieter models in apartment-friendly self-cleaning litter boxes—a dirty sensor makes any brand feel “broken.”
When sensor failure means replace the unit
Chronic sensor faults are a buy signal to switch brands—not keep replacing parts. Know the exit criteria before you sink a third overnight into the same error code.
Intermittent vs hard faults
Intermittent faults that vanish after cleaning are maintenance. Hard faults that return within days on a clean empty unit are hardware. If OEM parts are unavailable or quote near a better competitor, replacement wins.
| Pattern | Likely cause | Next step |
|---|---|---|
| False full after dusty week | Optics / litter | Clean + litter tweak |
| Cat sensor after refill | Calibration / depth | Reset baseline |
| Weekly hard fault when clean | Failing sensor/board | Support / parts quote |
| Cycles with cat inside | Critical safety fault | Stop use; replace/repair now |
Safety risks with bypass hacks
Forum “tape the switch” advice can cause uncontrolled cycling. Never bypass safety sensors. If a safety channel is unreliable, the machine is done as a pet appliance until repaired with real parts.
Upgrade paths after chronic errors
When automatic litter box sensor failure becomes weekly theater, shop repairability and sensor transparency—not just cycle speed. Prefer brands with documented resets and replaceable modules. Factor downtime, odor risk, and apartment noise into the switch; a reliable quieter unit can beat another year of phantom alerts.
Most “broken” auto litter boxes are sensor or calibration issues—not dead motors—but chronic hardware faults deserve a clean break. Document codes, get a parts quote once, then decide with numbers instead of hope.
Build a short exit checklist before emotions take over: three documented hard faults after proper cleaning, one OEM parts quote with shipping, and one competing model that solves your top pain (noise, capacity, or odor). If two of those three already argue for replacement, stop buying temporary “maybe it will recalibrate tomorrow” hope.
Also plan the cutover: keep a backup traditional box for 48 hours, deep-clean the area, and recalibrate the new unit on day one with the correct litter depth. A careful switch prevents carrying old habits—overfill, dusty trays, ignored rails—straight into the next machine’s sensor stack.
Owners who treat sensors as consumable hygiene items (wipe, depth, litter match) see fewer emergency tickets. Owners who ignore those basics will recreate automatic litter box sensor failure on almost any brand within a few dusty months. Keep the wipe cloth next to the scoop supplies so the weekly sensor pass actually happens.
Frequently Asked Questions
Why does my automatic litter box keep saying drawer full?
Optical and weight sensors misread when litter dust coats lenses, clay clumps block the drawer, or crystal litter scatters outside the tray. Deep-clean sensors, verify litter depth, and recalibrate in the app before assuming the sensor is dead.
What causes Litter-Robot cat sensor errors?
Weight sensor faults usually come from uneven litter depth, a cat sitting on the bezel during a cycle, or gradual calibration drift after 6–12 months. Power-cycle, reset litter level, and inspect the pinch detect area; persistent errors often need a sensor or control board swap.
Can I fix litter box sensors myself?
Cleaning, recalibration, and firmware resets are safe DIY steps. Replacing sensors or opening control boards may void warranty—document symptoms first and use OEM parts when available. Bypassing safety sensors is unsafe and can cause injury or uncontrolled cycling.
Why won't my automatic litter box start a cycle?
Most no-cycle cases are sensor interlocks—cat detected, drawer ajar, waste full, or safety trip—not a dead motor. Clear error states, reseat the drawer, check litter depth, and only then suspect mechanical failure if motors hum without motion.
When should I replace a unit for chronic sensor faults?
Replace when cleaned sensors still hard-fault weekly, OEM parts are unavailable or cost near a better competitor, or safety sensors fail intermittently. Chronic automatic litter box sensor failure is a brand-switch signal, not a loyalty test.